 |


Members
Login
|
Stephen A Jesic
AFC, ARCALM, SAA
Wildlife in their natural habitat |
|

|
|
| |
|
|
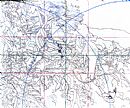
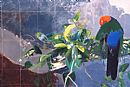
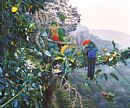
1. COMPOSITIONAL DRAWING-full size 30inches x 36inches
I always start with this traditional construction grid and place major elements in the painting along these lines. Red lines represent line of thirds. Green lines dissect the board in half. Finally the blue lines are the golden mean.
|
|
|
2. INITIAL ROUGH IN
As the painting was very complex I wanted to cover the board as quick as possible and simplified major areas. This enabled me to establish the correct overall feeling of atmosphere and light. Make sure its right before committing to detail. Its very hard to make changes after spending hours or weeks on an area only to find its wrong!
|
|
|
3. GRID TRANSFER
I drew a grid network in white watercolour pencil over the rough in to enable me to properly scale and transfer the compositional drawing to the painting. I proceeded to rough in the branch and bird to check the tonal range of the foreground against the background. Yes, first check, atmospheric perspective.Background must be lighter, cooler, greyer and less detailed than the foreground. So far so good.
|
|
|
4. BRANCH ROUGH IN
Further rough in and check of the atmospheric perspective. Still testing the tonal values and colour saturation of foreground against background without committing to a lot of detail.
|
|
|
5. DETAIL VIEW-BRANCH ROUGH IN
I kept working along the branch to the left. This is the center of the painting so I wanted to further check the tonal values and colour saturation of the leaves. Yellow easily saturates the eye so I made sure the leaves sat right against the background. You can see here I only drew a section at a time then blocked it in .
|
|
|
6. ESTABLISH FINAL BLOCK IN
I kept working to the left blocking in all the major areas. I also established the tree in the middle distance and correct atmospheric perspective as this was an integral part forming a backdrop for the foreground parrot on the left. I see too many wildlife artists with no middle distance, just foreground then a lazy depthless airbrush fuzz.
|
|
|
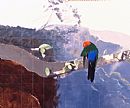
7. DETAIL VIEW-BRANCH AND BIRD
Just a good look at how rough the block in is at this stage. Look at the relationship between foreground and middle distance. Darks in the middle distance cant be as dark as foreground darks. Again, atmospheric perspective.
|

|
|
8. DETAIL VIEW-ADDING MORE DETAIL
I started to add more detail and worked up the birds and foliage. I wanted the parrots to have that iridescent feather quality that they have without overdoing it. Again, they have to sit right atmospherically, conform to the scenes natural light and not pop out of the painting.
|
|
|
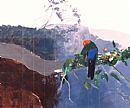
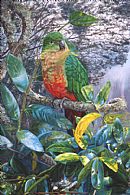
9.DETAIL VIEW-FINISHED DETAIL
Compare the previous step with the finished state. Everything is sitting right. Detail of foreground to background is also correct. Again, atmospheric perspective.
|
|
|
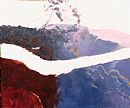
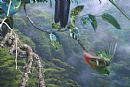
10. DETAIL VIEW-FINISHED FORGROUND TO BACKGROUND
Finished view of the foreground, misty valley and the extreme background. The rainforest canopy and misty clouds form an atmospheric perspective gradient from the top of the ridge to the bottom of the valley and form a depth of field link between extreme background and foreground. This was a very difficult area to control as it had to still sit behind the middle distance tree behind the bird on the left. Yes, 4 atmospheric perspective layers.
|
|
|
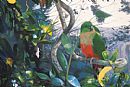
11. DETAIL VIEW-FINISHED VALLEY
Just a reinforcement of the previous step. Detail in the bottom of the valley does not compete with the foreground. Nice detail and warmer tones on the vine separating foreground and background. The bird on the right was place on the blue golden mean to exaggerate the drop and exit of the bird and viewers eye out of the painting.
|
|
|
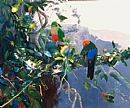
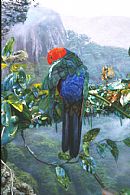
12. FINAL PAINTING OF "KING PARROTS FORTRESS"
I thought I would never get there, that atmospheric gradient in the valley drove me crazy. I put too much detail into it and it was coming forward too far. I really cracked it, picked up my airbrush and added the misty clouds from the top of the valley to the bottom in desperation. It worked, only had one chance to do it!
|
|
|
|
| |
|
|
|
|
|
|

|
|