 |


Members
Login
|
Linda Rossin
SAA, AFC, MAA, MPSGS, CPA, AMA, ICMA
Birds, Mammals, Fine Art Miniatures |
|

|
|
| |
|
|
Miniature Painting Demonstrations
People always want to know how I create my miniatures. With the convenience of the internet I can now share a few of my approaches. Accompanied by a brief comment for each step, the minis below are shown from start to finish.
My medium is acrylic paint, and as you can imagine, my brushes are very tiny. They range from #2 all the way down to #0000. Another tool most miniaturists use is a magnifier. These come in all shapes, sizes, strengths and models. A pair of reading glasses and a simple hand held magnifying glass work best for me.
Although I worked from photographs I didnt just simply copy them. I made alterations to improve on critter attitudes, composition, values and compensated for camera distortions. To appreciate the details of each step, click on any image to enlarged it! Enjoy!
|
|
|
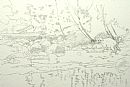
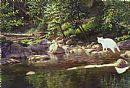
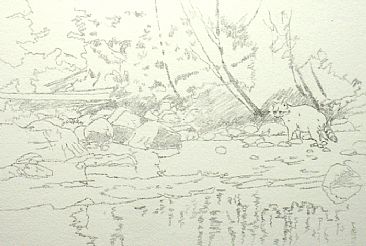
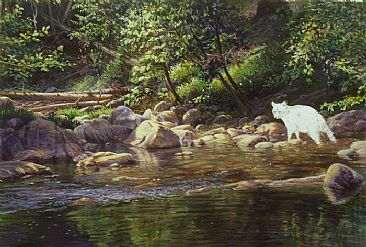
Crayfish Cravings
1.
For miniatures I often work on Strathmore® Illustration Board, 500 series. This archival product is 100% cotton rag with an almost indestructible surface!
|
|
|
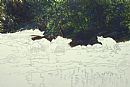
2.
For the wooded background I decided in order to create the mood of early evening it would be best to work from dark to light. I began by blocking in the slope of trees with rather Impressionistic brush strokes. Here I set my dark and medium values along with their overall hue. Very few details were introduced at this starting point.
|

|
|
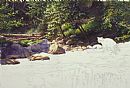
3.
Knowing in my mind exactly where I was going with this piece I developed the background detail by first adding some details to the darkest areas. As I moved to my medium values I brought in my light values as well, enlivening the colors along the way. I worked from dark to light as well as light to dark and repeated this process until I was satisfied that everything worked in harmony.
|
|
|
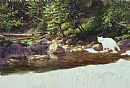
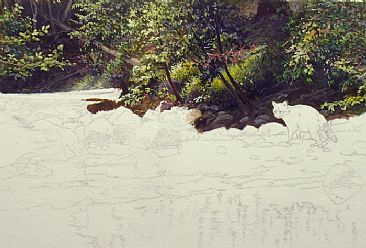
4.
As I moved to the mid section of this mini, I not only had to maintain correct values, but because of the shadows on the rocks I had to concern myself with warm and cool colors as well. I worked from back to front and right to left. Note that my light source has now become more discernible with these additions.
|
|
|
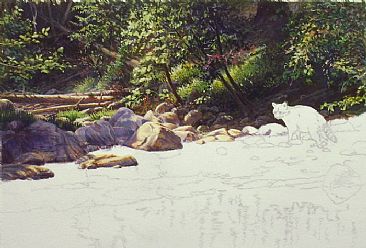
5.
With most of the rocks painted I moved down into the stream area. I left white shapes for the rocks nearest the raccoon only because it was easier to paint them and their reflections after the water was completed.
|
|
|
6.
Once the transparent part of the stream was finished I filled in the missing rocks nearest to the raccoon. I then pursued the foreground reflections and added a bit of motion to the rather still stream and left additional white space for more rocks.
|

|
|
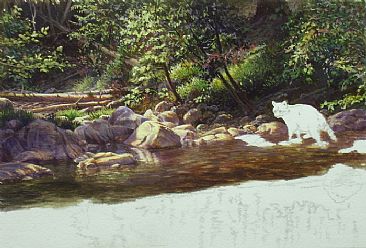
7.
I added some highlights where the stream glides over a small underwater ridge. I have also now completed the rocks and their reflections which appear above the waterline in this same area.
|

|
|
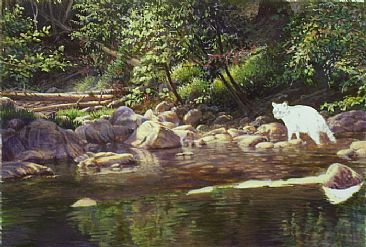
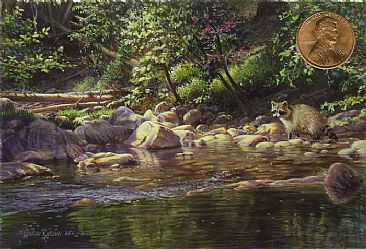
8.
At long last I painted my critter, refined some overall details and added the most important highlights. When I was satisfied there was nothing more to do I added my signature. (The penny is for scale.)
|
|
|
Painting the Grisaille Way With Water-mixable Oil Paint
All these years you thought oil and water didn't mix. Well, guess again
when it comes to the latest in oil paint, they actually do. Im not a big fan of all the solvents used for traditional oil painting and decided to try Holbines Duo Aqua Oil (water-mixable oil paint) for my latest florals. It is not suggested that you actually paint using water, but rather to use it for clean up, which sure makes this process a lot easier. Im in love with the quality of this paint and certainly with the ease of clean up. And yes, they are REAL oil paints!
When it comes to using traditional or water mixable oils, it is necessary to work fat over lean so the paint doesnt crack over time since lean layers dry faster than fat layers do. This means less oil content in the thin under layers and more oil in the thicker upper layers. This is especially important if a painting will be worked on over a period of weeks, or even months. Since I often work in layers, I do use mediums such as W & N Water Mixable Thinner and Stand Oil. These help the rather heavily pigmented, heavier bodied Holbine Duo Aqua Oil paint to glide more easily over my working surface, which is vital when painting fine details.
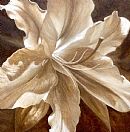
Lastly heres what grisaille actually means: it is a method of painting in monochrome typically using gray or sepia tones. Below is an example showing how one of my oil paintings was developed using this method.
|
|
|
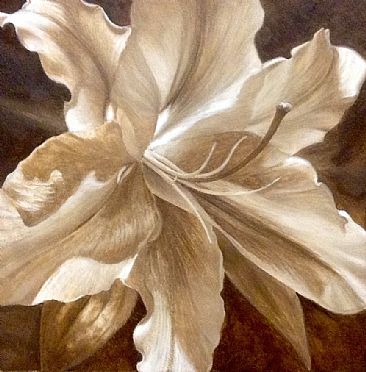
Radiance
1.
First my original drawing was transferred to the painting surface. I mixed burnt sienna with a tad of ultramarine blue, then thinned this combination with some water-mixable W & N Thinner. I began by putting in the background where the darkest darks appear. I then proceeded to the halftones in the flower. While carefully avoiding the stamen and carpel, I started with the darker values and worked my way to the lightest values in each petal until I was satisfied with my overall value scheme. I let this dry overnight.
|
|
|
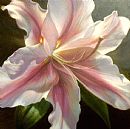
Radiance
2.
I began my actual color layer with opaque paint making sure to match the overall values of the monochromatic underpainting. For this application I mixed my paint with W & N Thinner and a tiny bit of their Stand Oil, both water-mixable. Once this second layer was complete, I let the painting dry before going on to the next step.
|
.jpg)
|
|
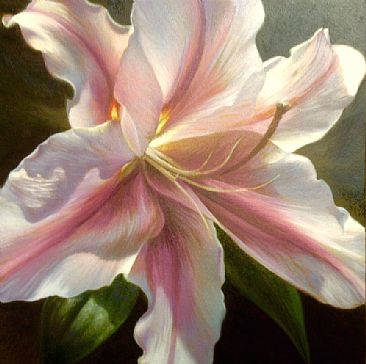
Radiance
3.
I saw that the shadow on the nearest leaf was wrong, so I corrected this. I then brought out petal highlights and made some adjustments to a few of the mid-range and darker values. After I was satisfied that all was correct, I began to add details to the petals using both opaque and glazing (transparent paint) applications. This was done using a little more stand oil and a little less thinner into the paint to maintain fat over lean. The stamen and carpel were painted last.
Once the painting was dry to the touch I sprayed it with retouch varnish to protect its surface. After this piece sat for nearly six months (a necessity) I applied the final varnish.
|
|
|
|
| |
|
|
|
|
|
|

|
|

.jpg)