 |


Members
Login
|
Ken Nash
AFC
Realscapes: photorealistic acrylic landscapes |
|

|
|
| |
|
|
Artistic Techniques and the Creative Process
Artistic Techniques
In order to discuss techniques, I feel you should understand my main objective in painting as I do. I am guided by my desire to recreate, with few exceptions, what I see in the photo reference(s). If a subject reveals a certain magnitude of beauty and distinction, I will use whatever techniques I must that result in an accurate depiction of the reference. Although I will begin with one and two inch brushes to build in larger swatches of colour as may be present, I will switch to smaller brushes to begin the process of adding detail and finally will use 10/0 and 18/0 brushes to finish the painting. The use of these brushes plus the fact that I further hydrate the fluid acrylics, enable me to minimize the presence of brush strokes and give my paintings a softer tone that is recognizable. The layering of colour with small brushes, as well as, the suitable application of light and shadow, enable me to also add depth to my paintings. I will also use a variety of tools to get the effects Im looking for. I may use scrunched up newspaper, sponges, and even wooden skewers to provide detailed texture including for the leaves of middle distance deciduous trees. If one were to undertake a forensic examination of some of the utensils in the house they might find the evidence of acrylic residue. I also has a compressor and an airbrush which might be employed in order to achieve a specific tonal gradient such as the gradual blending of the sky from the top to the horizon. So the end justifies the techniques that are applied. In minimal instances, the end may include changes that I have determined will result in a brighter, or more sombre, or better composed painting. In my mind, the changes will result in a more natural setting given how cameras dont always reflect what the eye sees.
Creative Process
Like most folks, I always have my Iphone with me or, in addition, my camera if I know Ill be traveling in areas Ive never been or that include time in the outdoors. These photos are uploaded to a file that I review from time to time. At the beginning of the year I will create a separate file of potential projects for the coming year. When I am approaching the completion of a painting, I will review the photo references for that year and decide on my next project. I will print the photo reference (8 x 10) and study it for a few days to establish a plan that I can execute and to also determine the specific challenge(s) that may be apparent. I will then decide on the size of canvas that I want to use and will start the next painting after breaking for a couple of days after completing the previous painting. Based on the constraints of my painting space, I work on only one painting at a time.
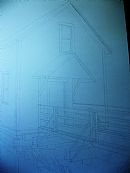
My plan for the painting includes figuring out a scale based on the canvas size and sketching and drawing the basics of the subject according to the scale. For a photorealist, this is as important as any part of the painting given that whatever else follows will be mostly based on the accuracy of the sketch/drawing. I have never used a projection device or a grid system to sketch out a subject so perhaps my work has some imperfections that might be noticed in comparison to the photo, but I still value my ability to visually transfer the subject to the canvas or board. It means that I do use a ruler and some math to ensure the scale is correct, but for the most part I rely on my understanding of perspective and geometry to develop the sketch.
I use a palette box of my own making which includes a plastic container (13 x 13) that closes (doesnt seal), which is covered on the bottom with approximately three layers of paper towel that has been soaked in water and wrung out, and then covered with a piece of parchment paper. I will create my colours (normally a limited palette) and minimally hydrate them to the desired consistency. Given that moisture will wick into the parchment paper over the next twenty-four hours, one must be careful how much water to add. If there are areas in the painting that require pristine brightness, I will mask these spots (normally using masking fluid) prior to painting. I start the painting at the top of the canvas and will proceed to the bottom, painting background to foreground.
I normally paints five to six hours a day and on average five days a week. Given my style of painting, it still takes me two to three months to complete a 30 x 40 painting dependent on the complexity involved. As a result I may be putting in 300 to 350 hours to complete a painting. So what do I have that is so critical to his success? Patience. Members of his family have told me (I hope in jest) that I use all of my patience on my paintings and have little left for them! My techniques take time and there is only one way to ensure the best results.
Another way I try to ensure the best results is with a light check just before sunset. I compare the painting to the reference photo with the blinds open in the area I paint but with artificial lights off. With just this ambient light I compares the tonal values to determine if I am on point with the reference photo. Before sleep overtakes me at night I will think about my progress that day and plan for the next.
With my larger canvases, I ensure they are gallery wrapped which enables the paintings to have a professional appearance. I also make sure that I paint the outside parts of the canvas at the same time as I am doing the front so there is a continuity of colour and tone all around. Once I am at the point of using my small brushes I know I am close to being finished and will do more checks with the reference photo to make certain I am adding the right details. Once completed, I will determine if I will varnish the painting and then ready it for the final steps. I will add paper backing and a wire and establish a price based on a formula delivering a square inch cost which includes the area of the painting, materials, complexity and framing as applicable. I save the reference photo for posterity.
|
|
|
|
| |
|
|
|
|
|
|

|
|
